Get Started
Welcome to Convertify!
The best way to get acquainted with Convertify Android App is to head over to Android Studio and open the source code we provide.
Most of the available configuration options are explained below, but sometimes the best approach is simple trial and error to see how things work in your app. You don't need any former coding experience to tweak all features. Please contact us if you have any questions.
You can also check this video for a quick start guide:
Source code
Website URL
The website URL is the home page of your app. You can change the website URL of your app by making changes in your Settings.java file. You can find this file on this directory: app/src/main/java/com/app/yourappname/Settings.java
public static final String HOST = "example.com";
public static final String HOME_URL = "https://example.com/";
The HOST variable is your domain and the HOME_URL variable is your URL. You can use subdomains and file paths on HOME_URL like this: https://subdomain.example.com/file.html
App name
You can change the name of your app by making changes in your strings.xml file. You can find this file on this directory: app/src/main/res/values/strings.xml
<string name="app_name">Your app name</string>
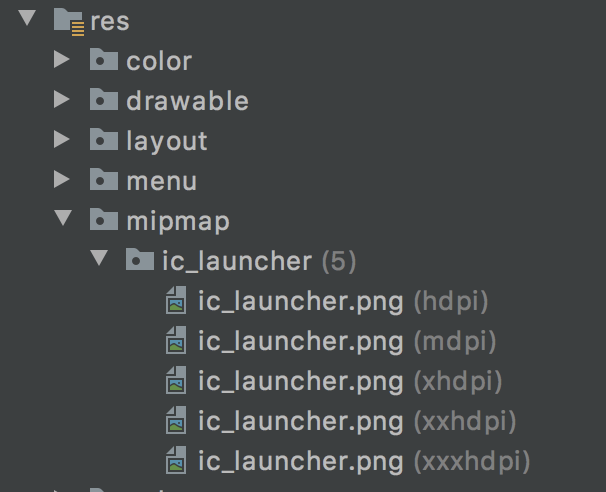
App icon
You can change the app icon on this directory app/src/main/res/. Android uses 5 different icon sizes, to change the app icon you need to replace this 5 files. The files are called iclauncher.png and are located inside the mipmap folders. Each file has to have a different image size: mdpi is 48x48px, hdpi is 72x72px, xhdpi is 96x96px, xxhdpi is 144x144px, xxxhdpi is 192x192px
Alternatively, you can use this helpful tool to generate all icon sizes: Convertify Icon Generator
Splash Screen
A splash screen is a introductory screen that appears before loading the app, it allows to render your website while providing some visual imagery so that it appears completely loaded once the splash screen disappears. You can change the number of seconds it appears or turn it off at app/src/main/java/com/app/yourappname/Settings.java
  public static final boolean SPLASH_SCREEN = true;
  public static final int SPLASH_SCREEN_TIMEOUT = 2000; // milliseconds
You can also change the splash screen image at app/src/main/res/drawable/logo.png
Status bar

On Android, the status bar contains notification icons and system icons. You can find it at the top of the screen. You can change the hex color of the status bar on: app/src/main/res/values/colors.xml
<color name="statusBarColor">#0075D7</color>
By default the status bar uses light color icons. If you want to use a light color, for example white, for the status bar you will have to change the icons to dark. You can do that by adding this line of code to AppTheme and SplashTheme in this file app/src/main/res/values/styles.xml
<item name="android:windowLightStatusBar">true</item>
App Version
There are 2 app versions you need to know:
The versionName is a string used as the version number shown to users.
The versionCode is a positive integer used as an internal version number, this number is used only to determine whether one version is more recent than another, with higher numbers indicating more recent versions. This is not the version number shown to users
You will be able to change both versions at app/build.gradle
Android Package Name
Every Android app has a unique application ID that looks like a Java package name, such as com.example.myapp. This ID uniquely identifies your app on the device and in Google Play Store. To change the package name please follow this video:
Key Store
Every Android app needs to be signed before uploading to the Play Store. In case you need it, here is the default Convertify key store:
keystore password: asdasd456
key alias: key0
key password: asdasd123
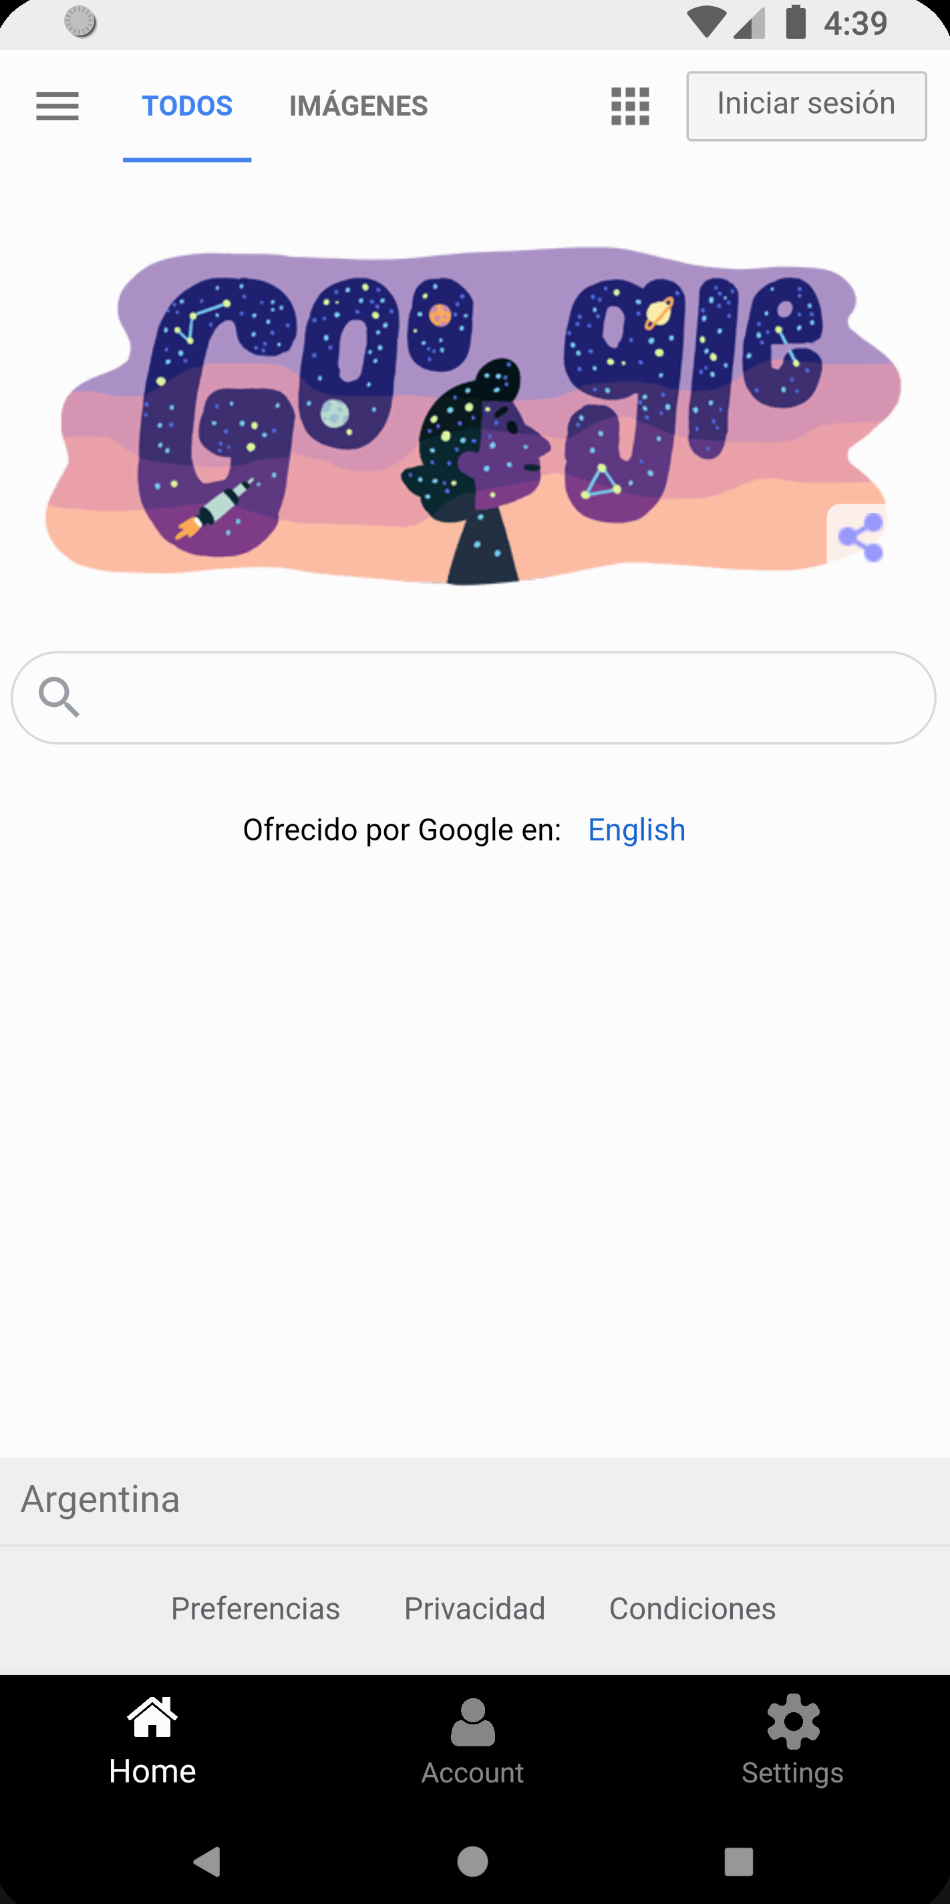
Navigation
Navigation patterns and usability on mobile web have improved drastically in recent years.
Many clients are satisfied with their existing web navigation, which ports directly into your Convertify app.
However, it may still be worth exploring the various navigation configuration options below to see if they might be a good fit for your app.
Configure your app to use a native sidebar navigation menu. Users access this navigation menu through a toggle button in the top left of your app, or by sliding from the left side of the screen.
You will be able to customize the navigation menu in: app/src/main/java/com/app/yourappname/Settings.java
    public static final boolean SHOW_DRAWER = true;
    public static final String [] DRAWER_TITLES = new String[]{
            "Home",
            "Account",
            "Settings"
    };
    public static final boolean SHOW_DRAWER_ICONS = true;
    public static final int [] DRAWER_ICONS = new int[]{ // put the icons in res >  drawable folder
            R.drawable.home,
            R.drawable.account,
            R.drawable.settings
    };
    public static final String [] DRAWER_LINKS = new String[]{
            "https://www.google.com",
            "https://www.facebook.com",
            "https://www.twitter.com"
    };
    public static final String TITLEBAR_TINT_COLOR = "white"; // color of icons and texts on titlebar (white or black)
    public static final String TITLEBAR_BACKGROUND_COLOR = "#000000";
    public static final String DRAWER_BACKGROUND_COLOR = "#ffffff";
    public static final String DRAWER_ICON_COLOR = "#000000";
    public static final String DRAWER_TITLE_COLOR = "#000000";
Configure your app to use a bottom navigation menu. Users can see the menu at the bottom of your app and will further enhance the native like experience.
You will be able to customize the navigation menu in: app/src/main/java/com/app/yourappname/Settings.java
    public static final boolean SHOW_BOTTOM_MENU = true;
    // Note: Bottom menu cannot have more than 5 items, Left Drawer can have more items
    public static final String [] BOTTOM_MENU_TITLES = new String[]{
            "Home",
            "Account",
            "Settings"
    };
    public static final boolean SHOW_BOTTOM_MENU_ICONS = true;
    public static final int [] BOTTOM_MENU_ICONS = new int[]{ // put the icons in res >  drawable folder
            R.drawable.home,
            R.drawable.account,
            R.drawable.settings
    };
    public static final String [] BOTTOM_MENU_LINKS = new String[]{
            "https://www.google.com",
            "https://www.facebook.com",
            "https://www.twitter.com"
    };
Internal/External Links
Use this configuration to specify which URLs should be loaded internally within your app, and which should launch the user out of the app and open in their default mobile browser. You will be able to customize it on app/src/main/java/com/app/yourappname/Settings.java
public static final boolean OPEN_EXTERNAL_LINKS_IN_BROWSER = false;
Set to true to open all external hosts in an external browser (outside your app).
Screen Orientation
Use this configuration to specify if the app will work in landscape or portrait mode. You can also choose both and the screen orientation will adapt automatically. Customize on: app/src/main/java/com/app/yourappname/Settings.java
public static final int SCREEN_ORIENTATION = 0; // 0=BOTH, 1=PORTRAIT, 2=LANDSCAPE
Loading Sign
A loading sign will appear everytime the user navigates to a new URL. You can disable this on app/src/main/java/com/app/yourappname/Settings.java or you can customize the color at app/src/main/res/values/colors.xml
public static final int SCREEN_ORIENTATION = 0; // 0=BOTH, 1=PORTRAIT, 2=LANDSCAPE
Pull To Refresh
This feature allow the user to reload the page by pulling down until the screen. You can disable it if you want and you can change the position of the loading sign at app/src/main/java/com/app/yourappname/Settings.java
    public static final boolean PULL_TO_REFRESH = true;
    public static final int PULL_TO_REFRESH_POSITION_FROM_TOP = 50; // dp
Offline App
You can choose to load local html, css and js files instead of loading a website URL. Place all your website files at app/src/main/assets/website and enable it at app/src/main/java/com/app/yourappname/Settings.java
    public static final boolean OPEN_LOCAL_HTML_BY_DEFAULT = false;
    public static final String LOCAL_HTML_INDEX_PAGE = "index.html"; // filePath >> assets/website
    public static final boolean OPEN_LOCAL_HTML_WHEN_OFFLINE = false;
You can also set up to load an offline page if the user opens the app and is not connected to the internet.
Features
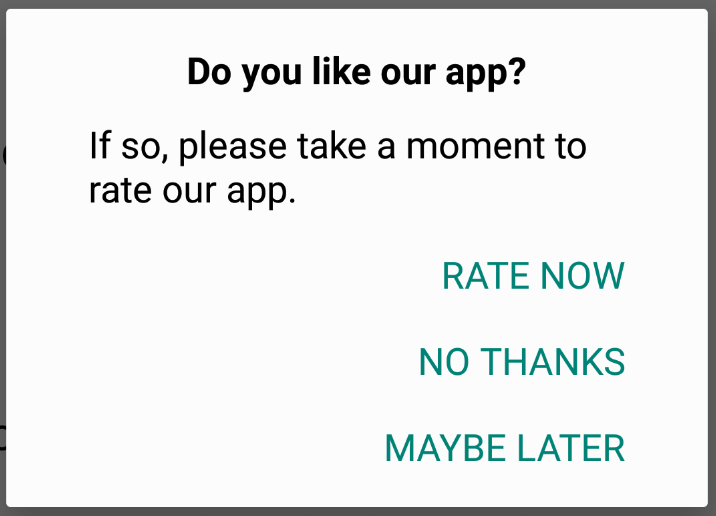
Rate Dialog
This feature will allow you to show a rate dialog prompting the user to leave a review on the Play Store. Enable this feature at app/src/main/java/com/app/yourappname/Settings.java
    public static final String PLAY_STORE_LINK_ID = "com.app.convertify"; // package name
    public static final boolean RATE_DIALOG = true;
    public static final int RATE_DIALOG_AFTER_APP_LANUCHES = 3;
To enable this feature set to true and write your package name. You can also choose after how many app launches the dialog will appear. Alternatively, you can manually prompt the dialog by adding a link to this url ratedialog://
Custom CSS
You may enter any custom CSS that you would like applied to each page in your app. One of the most common usages is to hide your web navigation elements when using native sidebar navigation. You may also hide arbitrary web elements within your app, such as the header and footer.
    public static final boolean INJECT_CSS = true;
    public static final String INJECT_CSS_FILENAME = "test.css";
To enable the custom css set the css injection to true. You have to create your css file at app/src/main/assets/website/css
Custom JS
You may enter any custom Javascript that you would like applied to each page in your app. One of the most common usages is to use an analytics solution like Google Analytics.
    public static final boolean INJECT_JS = false;
    public static final String INJECT_JS_FILENAME = "test.js";
To enable the custom js set the js injection to true. You have to create your js file at app/src/main/assets/website/js
QR Code
QR codes are two-dimensional versions of the barcode. QR stands for "quick response". The term refers to the immediate access to the hidden information in the code. Both their design and their functions can be personalized, and they are ideal for connecting conventional print media with any and interactive online offer. Convertify offers a built-in QR code scanner that allows scanning these codes and opening the URL inside the app.
<a href="qrcode://">Scan QR Code</a>
Use this code to open the QR code scanner.
Reset Cache & Cookies
Convertify supports all kind of cookies and has a built-in cache to spped up the app. You can reset all cookies and cache using this code:
<a href="reset://">Reset</a>
User Agent
The User-Agent request header is a characteristic string that lets servers and network peers identify the application, operating system, vendor, and/or version of the requesting user agent. You can customize it on app/src/main/java/com/app/yourappname/Settings.java
public static final String USER_AGENT = "Mozilla/5.0 (Linux; Android 9; SM-G973F) AppleWebKit/537.36 (KHTML, like Gecko) Chrome/75.0.3770.101 Mobile Safari/537.36 Convertify";
Admob
AdMob offers the possibility of monetizing mobile apps. It is a Google service for integrating Google ads into mobile applications. The AdMob program allows mobile application developers to incorporate ads. Convertify is ready for activating AdMob ads by default, and it allows you to monetize using banners and interstitial ads. Enable AdMob in app/src/main/java/com/app/yourappname/Settings.java
    public static final boolean BANNER_AD = true;
    public static final boolean INTERSTITIAL_AD = true;
    public static final int INTERSTITIAL_AD_AFTER_CLICKS = 5;
After you have enabled it you have to set up your admobAppId, admobBannerId and admobInterstitialId in app/src/main/res/values/strings.xml
    <string name="admobAppId">ca-app-pub-3940256099942544~3347511713</string>
    <string name="admobBannerId">ca-app-pub-3940256099942544/6300978111</string>
    <string name="admobInterstitialId">ca-app-pub-3940256099942544/1033173712</string>
Universal Links
Universal links are used to open your app from a browser. Check some examples here:
<a href="myapp://">App Home Page</a>
<a href="myapp://contact">App Contact Page</a>
You can link any page on your website domain. By default myapp:// will send the user to the app home page. You can send the users to internal URLs, for example, myapp://contact will send the user to yourdomain.com/contact.
By default the app uses myapp:// but you can chage it whatever name you want, like yourappname:// . You can do this on app/src/main/res/values/strings.xml
<string name="universalLink">myapp</string>
In-App-Purchases
Within some apps, you can buy additional content or services. These kinds of purchases are called "in-app purchases". They can be an attractive source of revenue for developers and are very convenient for customers as they use existing accounts and payment sources for settlement. Convertify allows triggering Google Play In-App Purchases.